Fuzzing Android Libraries with LibAFL QEMU Mode
In this post, we’ll build a LibAFL QEMU-mode fuzzer from scratch, walking through it block by block. We’ll also cover advanced "gotchas," such as getting AddressSanitizer (ASan) to play nicely with Android's Bionic libc inside QEMU.
Feb 23
Basic Fuzzing of Native Programs
Introduction to LibAFL
LibAFL is a modern, high-performance fuzzing framework written in Rust. Instead of being a single “one size fits all” tool like AFL++ or libFuzzer, it’s built as a set of reusable components (Rust crates) that you can mix and match.
Because of that modular design, security researchers can assemble fuzzers that fit a specific target and workflow whether that means snapshot-based fuzzing, custom coverage or crash feedback, or even combining fuzzing with symbolic execution without needing to fork and heavily modify a huge C codebase.
https://github.com/AFLplusplus/LibAFL
Please follow below url for installing Dependencies for Libafl
https://github.com/AFLplusplus/LibAFL?tab=readme-ov-file#building-and-installing
https://github.com/AFLplusplus/LibAFL
Please follow below url for installing Dependencies for Libafl
https://github.com/AFLplusplus/LibAFL?tab=readme-ov-file#building-and-installing
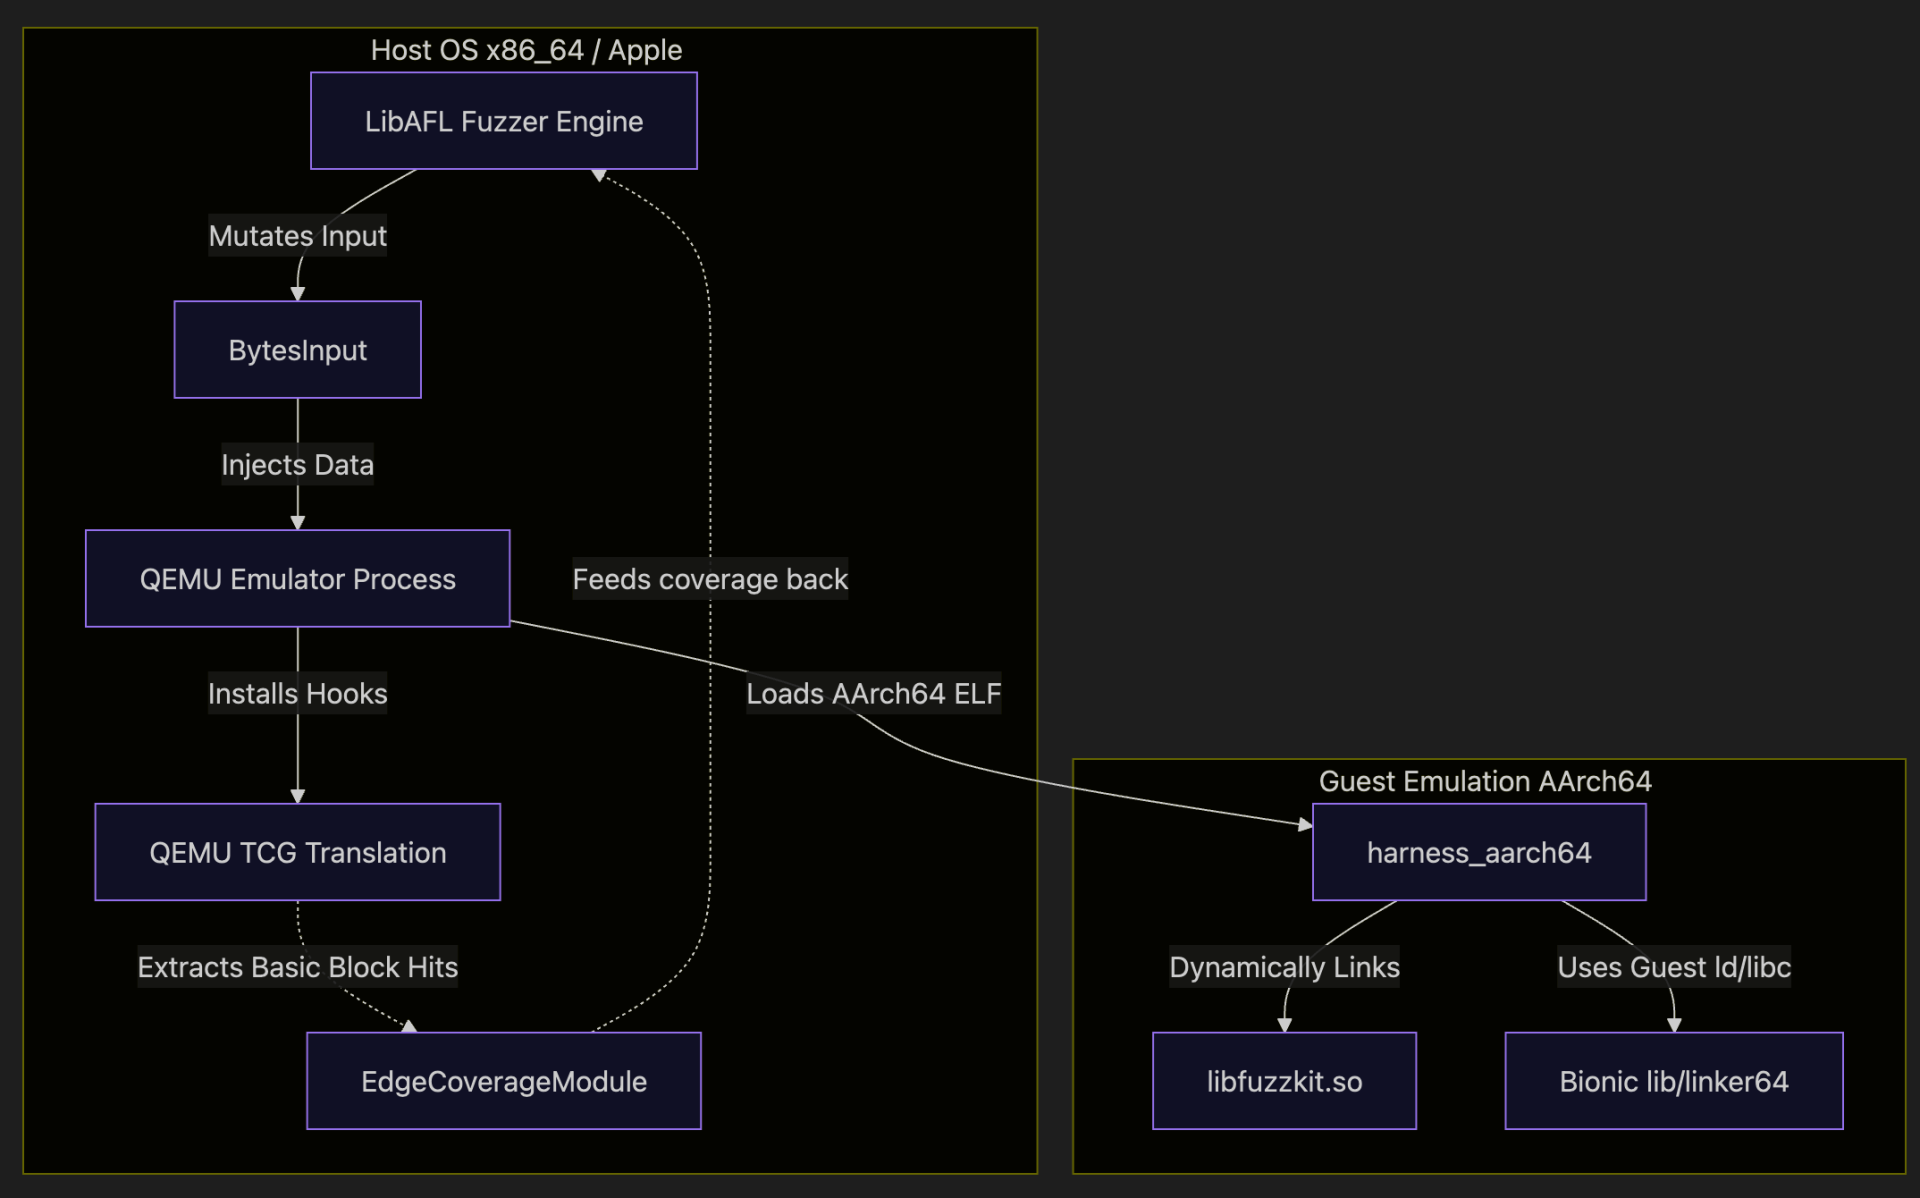
Here is a high-level overview of how the architecture interacts:
What are the advantages of using LibAFL?
- Extreme Customizability:You build your fuzzer out of blocks (fuzzer, Schedulers, Observers, Feedbacks). If you need a custom mutation strategy, you simply write a Rust function and plug it in. https://docs.rs/libafl/0.15.3/libafl/#modules
- Speed: Written in Rust with minimal overhead, allowing for execution speeds that often beat traditional C fuzzers.
- Rust Safety: Fuzzer development is prone to bugs. Rust's memory safety guarantees eliminate a huge class of common errors when building custom fuzzing harnesses.
- Multi-Platform / Multi-Architecture: Out-of-the-box support for Windows, Linux, Android, and macOS, alongside powerful dynamic binary instrumentation (DBI) backends like Frida and QEMU
What is LibAFL QEMU Mode?
LibAFL QEMU mode integrates the legendary QEMU emulation engine natively within LibAFL. Specifically, using QEMU User-Mode emulation, it allows you to run binaries compiled for a different architecture (e.g., AArch64 Android) directly on your host machine
The big win is speed and feedback: instead of launching a fresh QEMU process for every single test case (which is painfully slow), LibAFL keeps the emulator running and drives executions from within the fuzzing loop. Under the hood, QEMU’s dynamic translation engine (TCG) tracks which blocks/edges run, and LibAFL hooks that coverage directly into its observer maps so your fuzzer can make smart, coverage-guided decisions.
The big win is speed and feedback: instead of launching a fresh QEMU process for every single test case (which is painfully slow), LibAFL keeps the emulator running and drives executions from within the fuzzing loop. Under the hood, QEMU’s dynamic translation engine (TCG) tracks which blocks/edges run, and LibAFL hooks that coverage directly into its observer maps so your fuzzer can make smart, coverage-guided decisions.
Overview
You’ll usually see three chunks in a LibAFL QEMU setup:
- Target library (libfuzzkit.so): the thing you want to fuzz
- Harness(AArch64 ELF): calls into the library and exports `LLVMFuzzerTestOneInput`
- Host fuzzer (Rust, native on Linux): drives QEMU user‑mode + coverage feedback
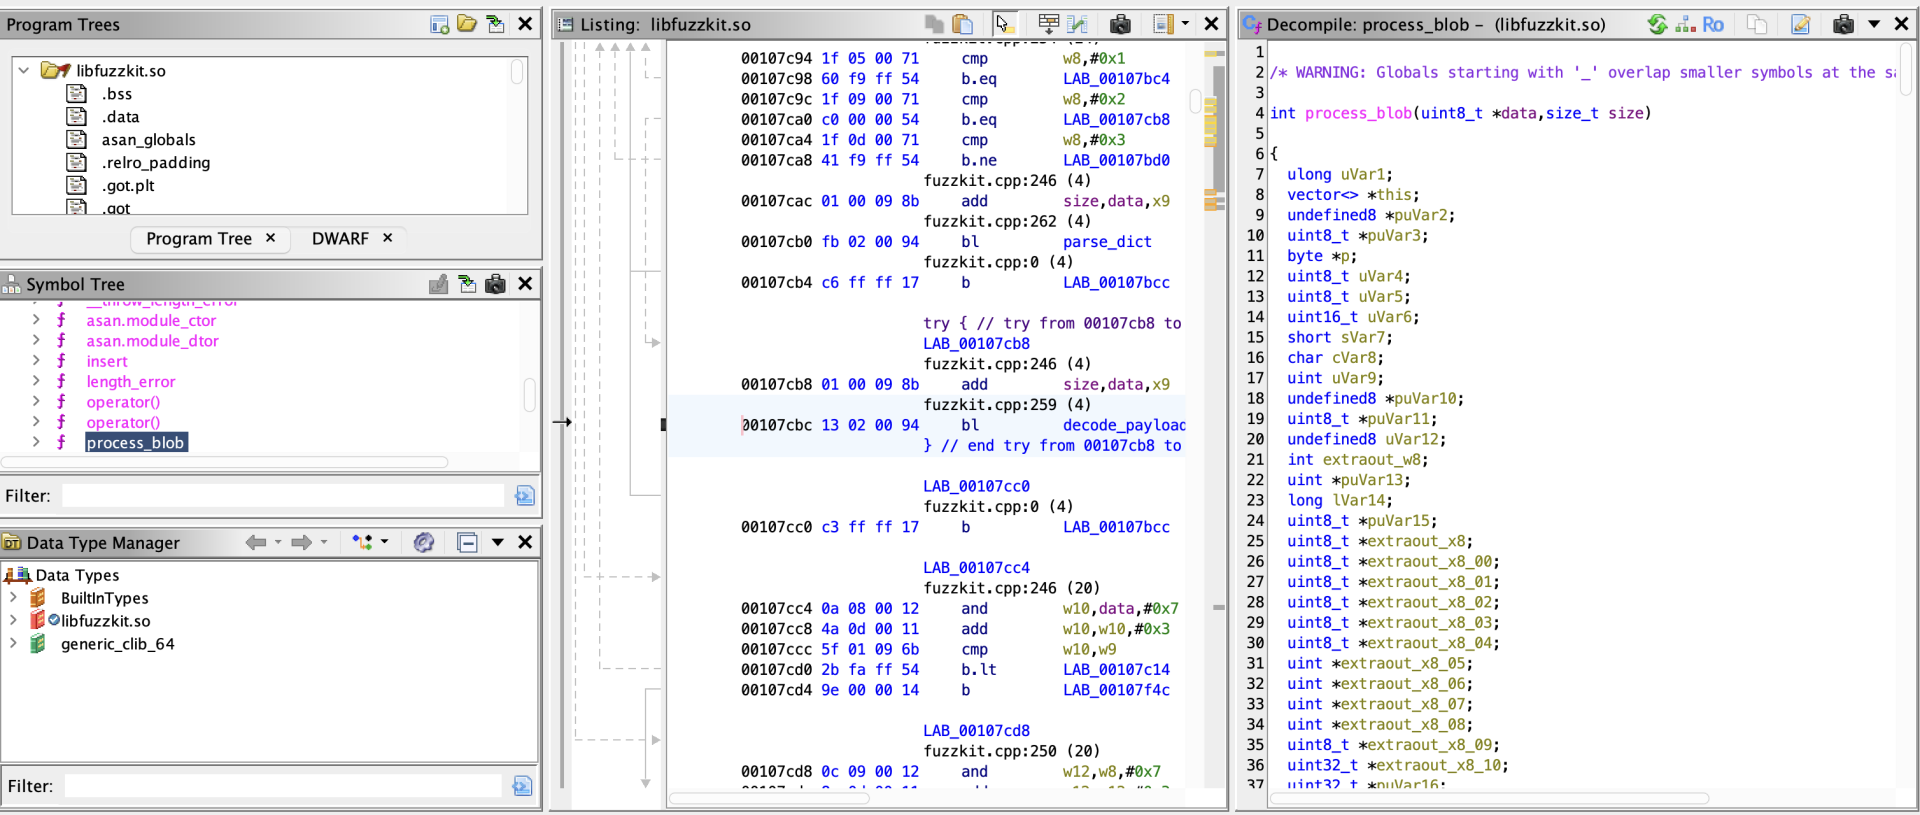
The Target Library
For this blogpost , we will be fuzzing a custom library called libfuzzkit.so.
Written in C++, this library parses structured Run-Length Encoded (RLE) payloads using the exposed function:
A common issue in C++ data parsers are Heap Buffer Overflows. To demonstrate a successful fuzzer, our library contains an intentional classic vulnerability: when a specific sequence occurs, it allocates a fixed 4-byte buffer but copies up to 127 bytes into it without bounds checking. Because this is an Android target, we compile this library to a native AArch64 shared object (`.so`) using the Android NDK.
Creating the Harness
A "harness" is a small wrapper program that takes input from the fuzzer and feeds it to our target library function.
We will write a C harness (`harness.c`) that exposes the standard `LLVMFuzzerTestOneInput` function. LibAFL will dynamically locate this symbol and hook it.
The fuzzer doesn't actually use `main` to loop. Instead, LibAFL will use QEMU to execute up to `LLVMFuzzerTestOneInput`, place a hook there, and repeatedly inject mutated inputs directly into guest memory!
Build the harness
Implementing the Fuzzer, Step-by-Step
Here is structure of code
host_fuzzer/src/main.rs → small Linux-only entrypoint
host_fuzzer/src/main.rs → small Linux-only entrypoint
host_fuzzer/src/fuzzer_impl.rs → the real fuzzer logic
host_fuzzer/cargo.toml → crates and dependencies
host_fuzzer/cargo.toml → crates and dependencies
The fuzzer entrypoint (main.rs):
main.rs is intentionally minimal:
This does two things:
- ensures we only run this on Linux (QEMU backend expectation)
- moves everything “interesting” into `fuzzer_impl.rs`
The real fuzzer: walking through `fuzzer_impl.rs`
This section follows the code structure in `fuzzer_impl.rs`. If you’re new to LibAFL, don’t worry about the names focus on the roles:
- Observer = “what we measure”
- Feedback = “how we decide an input is interesting”
- Objective = “what we save as a special finding (crash/hang)”
- Scheduler = “which input do we mutate next”
- Stage = “how we mutate / execute”
- Executor = “how we run the target”
- Fuzzer = "Main Fuzzing Engine"
Standard Rust utilities
- PathBuf: a convenient, owned file path type (used for --seeds, --out, --target, etc.).
- process: typically used for process::exit(1) on fatal errors.
- Duration: used to set timeouts like Duration::from_millis(1000) for each fuzz iteration.
CLI parsing
This enables #[derive(Parser)] on a struct like Opts, so your fuzzer can accept flags like:
- --target ./harness_aarch64
- --seeds ./seeds
- --out ./findings
- --timeout-ms 1000
LibAFL core (the fuzzing framework “engine”)
Think of this as: corpus + mutation + coverage feedback + scheduling + fuzz loop.
Corpus (where inputs are stored)
- Corpus: trait for “a place to store testcases”.
- InMemoryOnDiskCorpus: keeps metadata in RAM but stores actual inputs on disk (fast + persistent).
- OnDiskCorpus: pure on-disk storage (commonly used for crashes/).
Events + monitor output
- SimpleEventManager: handles communication between fuzzer components; for single-process fuzzing it’s the simplest option.
- SimpleMonitor: prints stats (execs/sec, corpus size, crashes).
Inputs
- BytesInput: the common “raw bytes” input type (like a file).
- HasTargetBytes: a trait to access the bytes inside an input (so your harness can read them).
Observers (what you measure during execution)
- VariableMapObserver: wraps a raw coverage map buffer (“edges map”).
- HitcountsMapObserver: converts a raw bitmap into hitcount buckets (better feedback).
- TimeObserver: measures execution time of each run.
- CanTrack: allows tracking changed indices in a map (useful for minimization/scheduling).
Feedbacks (how you decide an input is “interesting”)
- MaxMapFeedback: classic coverage feedback (“did this input increase coverage?”).
- TimeFeedback: treats slower inputs as interesting (optional, helps explore deep paths).
- CrashFeedback: marks crashes as objectives.
- TimeoutFeedback: marks hangs/timeouts as objectives.
- feedback_or / feedback_or_fast: combine feedbacks (e.g., coverage OR time; crash OR timeout).
Scheduling + stages + mutators
- QueueScheduler: basic FIFO scheduling.
- IndexesLenTimeMinimizerScheduler: wrapper that tends to prefer smaller/faster inputs when coverage is comparable (helps keep corpus efficient).
- havoc_mutations: the standard mutation set (bit flips, byte flips, insert/delete, etc.).
- HavocScheduledMutator: applies those mutations.
- StdMutationalStage: a “stage” that mutates and executes inputs.
State + fuzzer wrapper
- StdState: stores RNG, corpus, solutions, and feedback state.
- HasCorpus: trait to access corpus from state.
- StdFuzzer: a ready-made fuzzer pipeline built from scheduler + feedback + objective.
- Fuzzer: trait implemented by fuzzers (so you can call fuzz_loop).
- Error: LibAFL’s error type.
libafl_bolts (utility toolbox)
These are “support tools” used everywhere
- current_nanos: used to seed RNG (StdRand::with_seed(current_nanos())).
- OwnedMutSlice: wraps a raw pointer into a mutable slice safely-ish; used for coverage maps.
- StdRand: LibAFL’s RNG (fast, deterministic when seeded).
- tuple_list!: LibAFL uses type-level tuples for “lists” of observers/modules/stages.
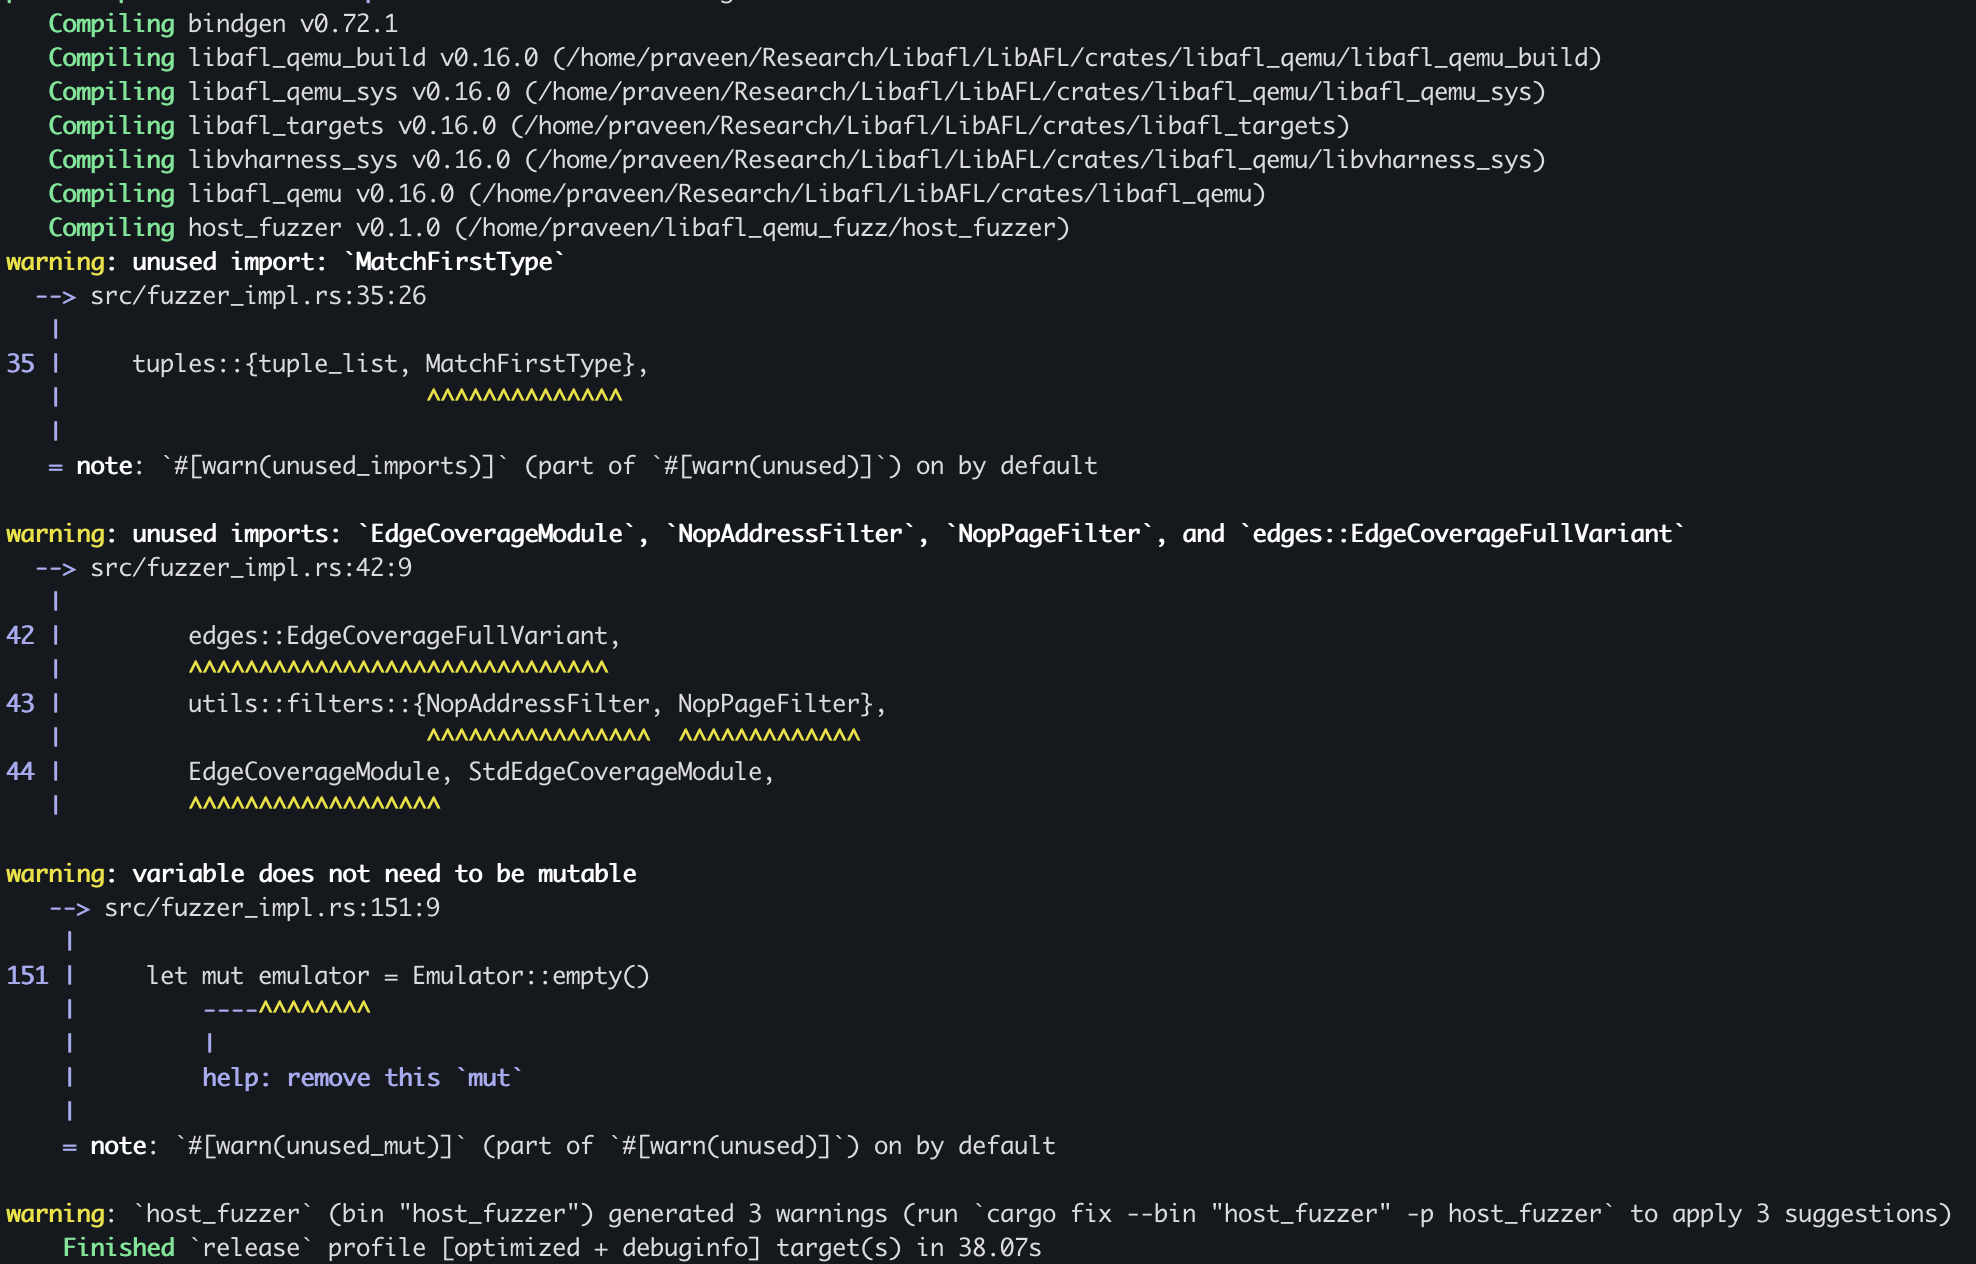
- MatchFirstType: helper when picking items out of these tuple lists.
- AsSlice: trait used to view input bytes as &[u8].
libafl_qemu (the QEMU backend)
This is the part that makes “QEMU mode fuzzing” happen.
ELF symbol resolution
- EasyElf: parses the target ELF so you can resolve symbols like LLVMFuzzerTestOneInput and compute addresses correctly (often with load base).
Coverage modules
- EdgeCoverageModule / StdEdgeCoverageModule: QEMU-side coverage instrumentation that fills your edges map.
- EdgeCoverageFullVariant: the “flavor” of edge coverage you’re using (full variant usually means richer coverage tracking).
Filters (optional optimization)
- NopAddressFilter / NopPageFilter: “no filtering” filters (instrument everything).
- Later you can swap these for real filters to ignore library code or reduce noise.
Core QEMU types
- Emulator: constructs and configures the QEMU instance + modules.
- Qemu: handle to the running QEMU engine (read/write memory, set breakpoints, run).
- QemuExecutor: the LibAFL “executor” that bridges harness execution into LibAFL.
- QemuExitReason: why execution stopped (breakpoint, crash, etc.).
- TargetSignalHandling: how QEMU treats signals/crashes (e.g., return to harness).
- Regs: register identifiers (PC/SP/LR/args depending on arch).
- GuestAddr / GuestReg: types for guest addresses and registers.
- MmapPerms: memory permissions for guest mappings (RWX).
Arch helpers
- ArchExtras: architecture-specific conveniences (AArch64 calling conventions, etc.).
Bootstrapping QEMU and Finding Entry Points
First, we initialize the QEMU emulator with the correct arguments. Because we are fuzzing an Android binary, we must tell QEMU where to find the Android `rootfs` (the interpreter `linker64` and `libc.so`) and our target library.
What's Happening:
- "-L <prefix>": QEMU user-mode sysroot. For Android, this should point at your rootfs-like directory so QEMU can find the guest loader and libs.
- "-E VAR=...": guest environment variables.
- "ASAN_OPTIONS=abort_on_error=1": if you’re using ASan in the guest, this makes ASan *_crash_* rather than exiting politely (polite exits are invisible to crash feedback).
- final arg is the harness path (what QEMU should execute)
When debugging: print qemu_args and try running an equivalent command manually.
Resolving LLVMFuzzerTestOneInput
Next, we parse the loaded ELF to locate `LLVMFuzzerTestOneInput`. This is where we will inject our fuzzing data. We place a breakpoint at the function's return address so the emulator hands control back to LibAFL after every execution.
Setting up edge coverage
This line looks scary but conceptually it’s simple: “make an observer that watches the global edges map”.
- edges_map_mut_ptr() points to a shared coverage map (from libafl_targets)
- VariableMapObserver wraps a raw slice into an observer
- HitcountsMapObserver turns raw hits into “hitcounts” (useful for feedback)
- .track_indices() allows the scheduler to reason about which edges changed (helps minimization)
You can think of the edges map as “a giant bitmap of where we’ve been”.
Installing the EdgeCoverageModule
This is the QEMU side: it tells libafl_qemu, “when you translate/execute blocks, update _this_ observer’s map".
Then we build the emulator:
Then we build the emulator:
At this point:
- QEMU is ready
- the coverage module is installed
- we can start poking the guest
Breakpoints: the “return-to-harness”
We do two important things:
- stop when we reach LLVMFuzzerTestOneInput
- stop when it returns, so one “run” == one input
Conceptually:
- entry break gives QEMU a start stop-point
- return address breakpoint gives QEMU an end stop-point
Now every fuzz iteration can be:
- reset regs
- set args
- run until return breakpoint or crash
Mapping guest memory for inputs
Instead of allocating a new buffer each time, we map a fixed chunk once:
- Then for each input, we overwrite that memory with new bytes.
- This is fast and avoids fragmentation inside the guest.
Snapshotting registers (so each input starts clean)
This is basically your “checkpoint”.
Before every run you restore PC/SP/LR (return address), then set function arguments.
The harness closure
This is the most important block in the whole fuzzer, because it’s where your mutated bytes become “guest execution”.
- cap the input size (1 MiB) so you don’t write past the mapped buffer
- write bytes to guest memory
- restore execution context (PC/SP/RA)
- set `arg0=data_ptr`, `arg1=size` following the guest ABI
- run QEMU until:
- we hit the return breakpoint → OK
- we crash → Crash
- anything else → treat as OK (you can refine this later)
If your fuzzing loop “doesn’t do anything”, this is the first place I look:
- are we writing input to the right place?
- are we setting PC correctly?
- are we actually stopping at the right return address?
Feedback vs Objective (coverage vs “findings”)
Feedback decides what goes into the evolving corpus. Objective decides what’s “special”.
- MaxMapFeedback: “did this input increase any edge hitcount?”
- TimeFeedback: optional secondary signal (useful for slow paths)
- CrashFeedback: “did the executor return ExitKind::Crash?”
- TimeoutFeedback: “did we exceed the per-run timeout?”
State + corpus
This setup is a pragmatic middle ground:
- keep hot corpus metadata in memory
- store testcases on disk (so you don’t lose them)
- store crashes on disk as a separate corpus
Executor: the QEMU bridge into LibAFL
The executor:
- calls your harness closure each run
- updates observers (edges/time)
- reports `ExitKind` (Ok/Crash/Timeout)
- integrates with the event manager for progress reporting
Mutation stage: “havoc” is the classic starter
Havoc mutations are a good baseline:
- bit flips
- byte flips
- insert/delete
- interesting values
Once your loop is stable, you can layer structured mutations, dictionary mutations, cmp-log, etc.
Fuzz loop: the part that’s almost boring (in a good way)
If everything above is correct, this should:
- keep running
- grow the corpus when new coverage appears
- save crashes/timeouts into the findings directory
fuzzer_impl.rs
Cargo.toml: Crates and Dependencies
In Cargo.toml, the Crates and Dependencies section defines the core building blocks used by the fuzzer. clap (with the derive feature) is used to create a clean command-line interface for options like target path, corpus directories, and timeouts. log and env_logger provide lightweight logging so you can enable useful runtime output with RUST_LOG=info without hardcoding print statements. The main fuzzing logic comes from libafl, which provides the framework pieces like corpus management, schedulers, mutators, observers, feedback, and the fuzz loop itself. libafl_bolts adds shared utilities (randomness, tuple helpers, safe-ish map wrappers, and better backtraces via errors_backtrace) that LibAFL uses across components. libafl_qemu (enabled with usermode) is the key dependency that embeds QEMU user-mode emulation into LibAFL so the fuzzer can execute foreign-architecture binaries while collecting coverage. Finally, libafl_targets provides the standard shared coverage map layouts and target-side helpers that integrate neatly with LibAFL’s observers and feedback system.
Build the fuzzer
After the fuzzer builds successfully, you’ll find the compiled binary in your project’s target/release/ directory
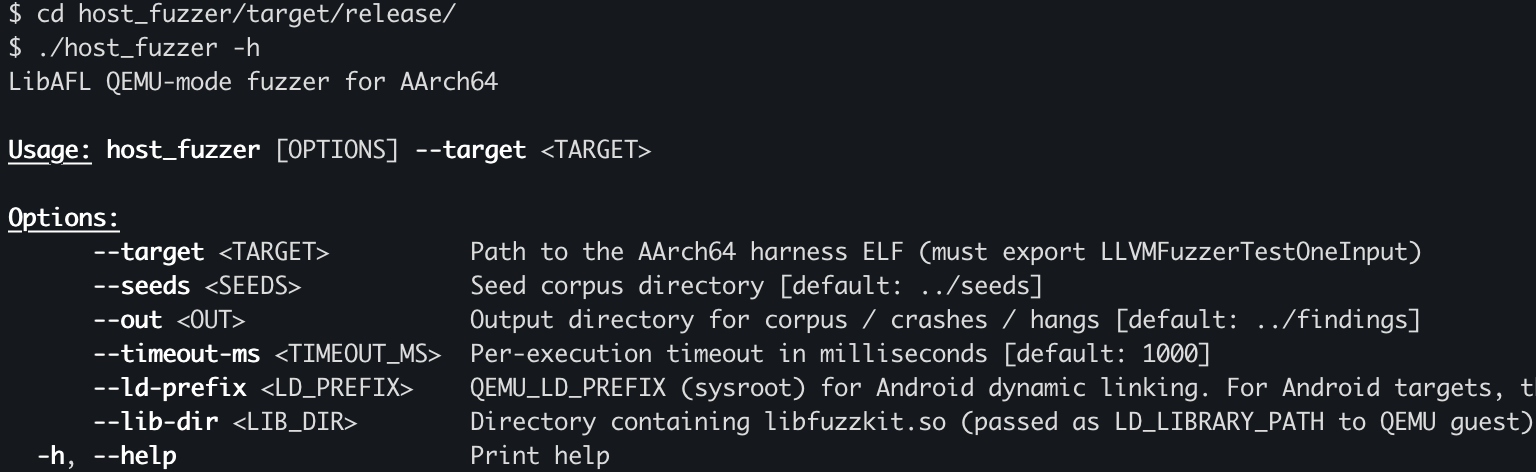
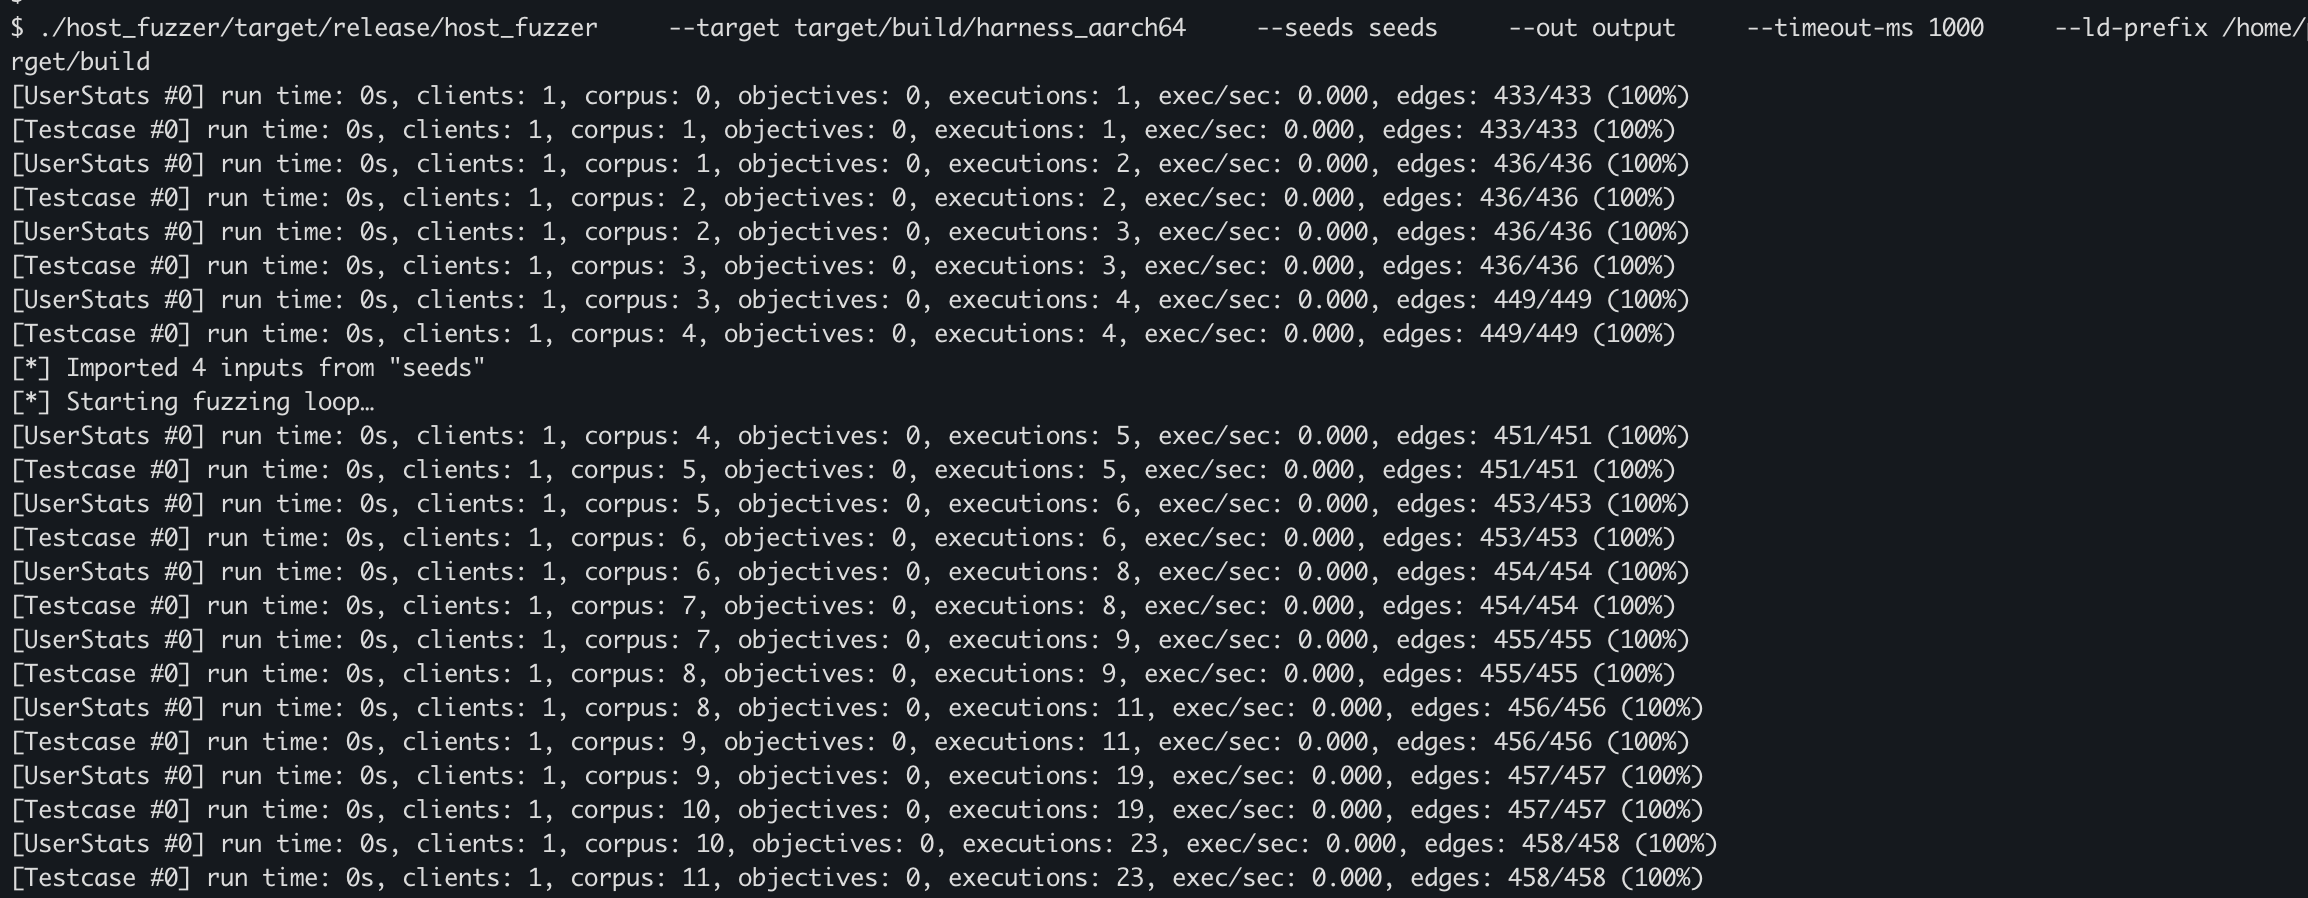
Run the Fuzzer
Before running the fuzzer, we need to copy the custom library that the harness depends on, because it isn’t included in the root filesystem. In my case, I created a target/build directory inside the project and copied the required files there.

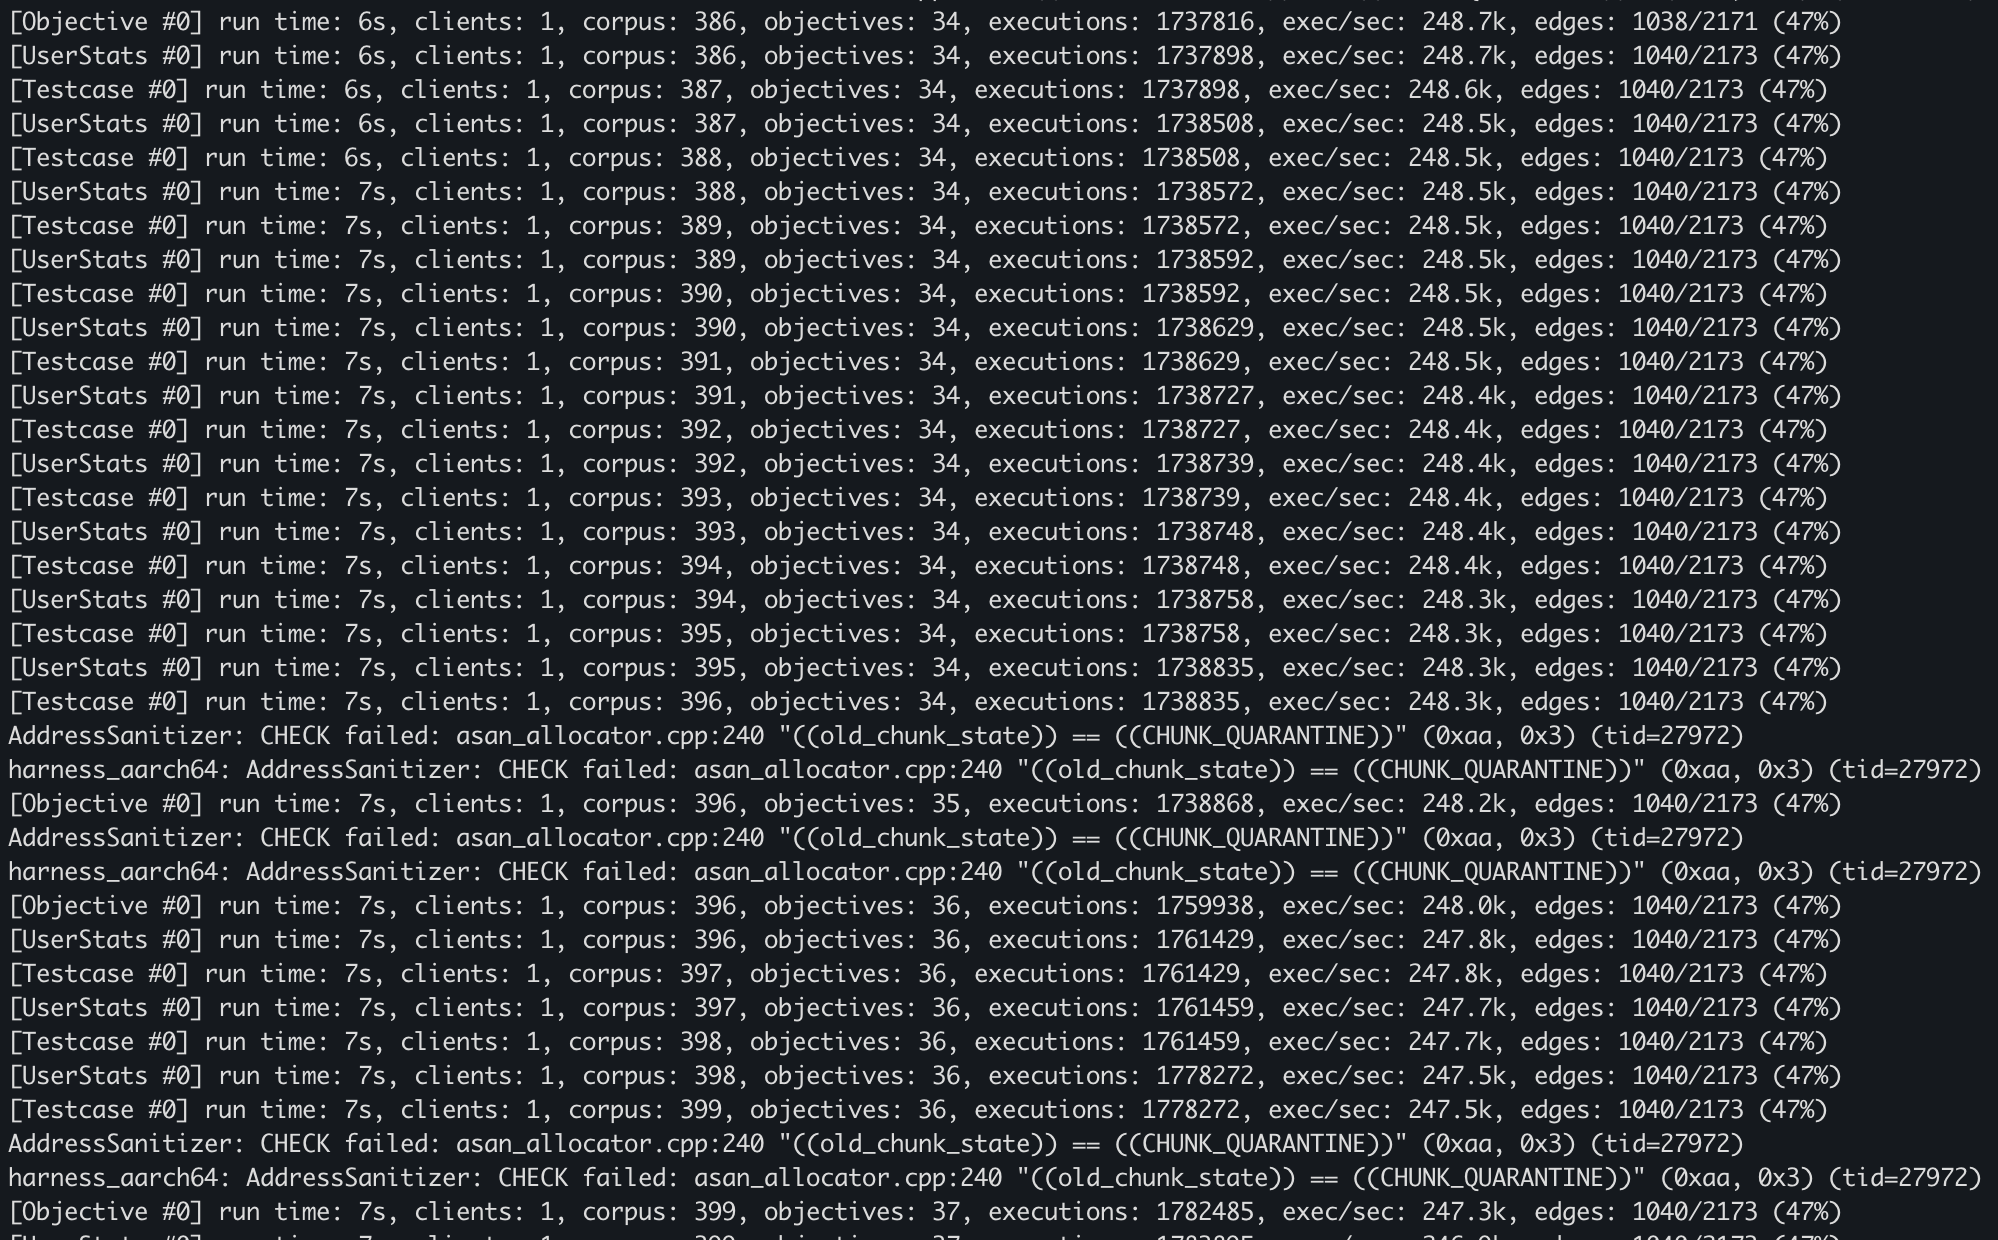
After some time, our fuzzer discovered about 36 objectives.
Analyse Crashes
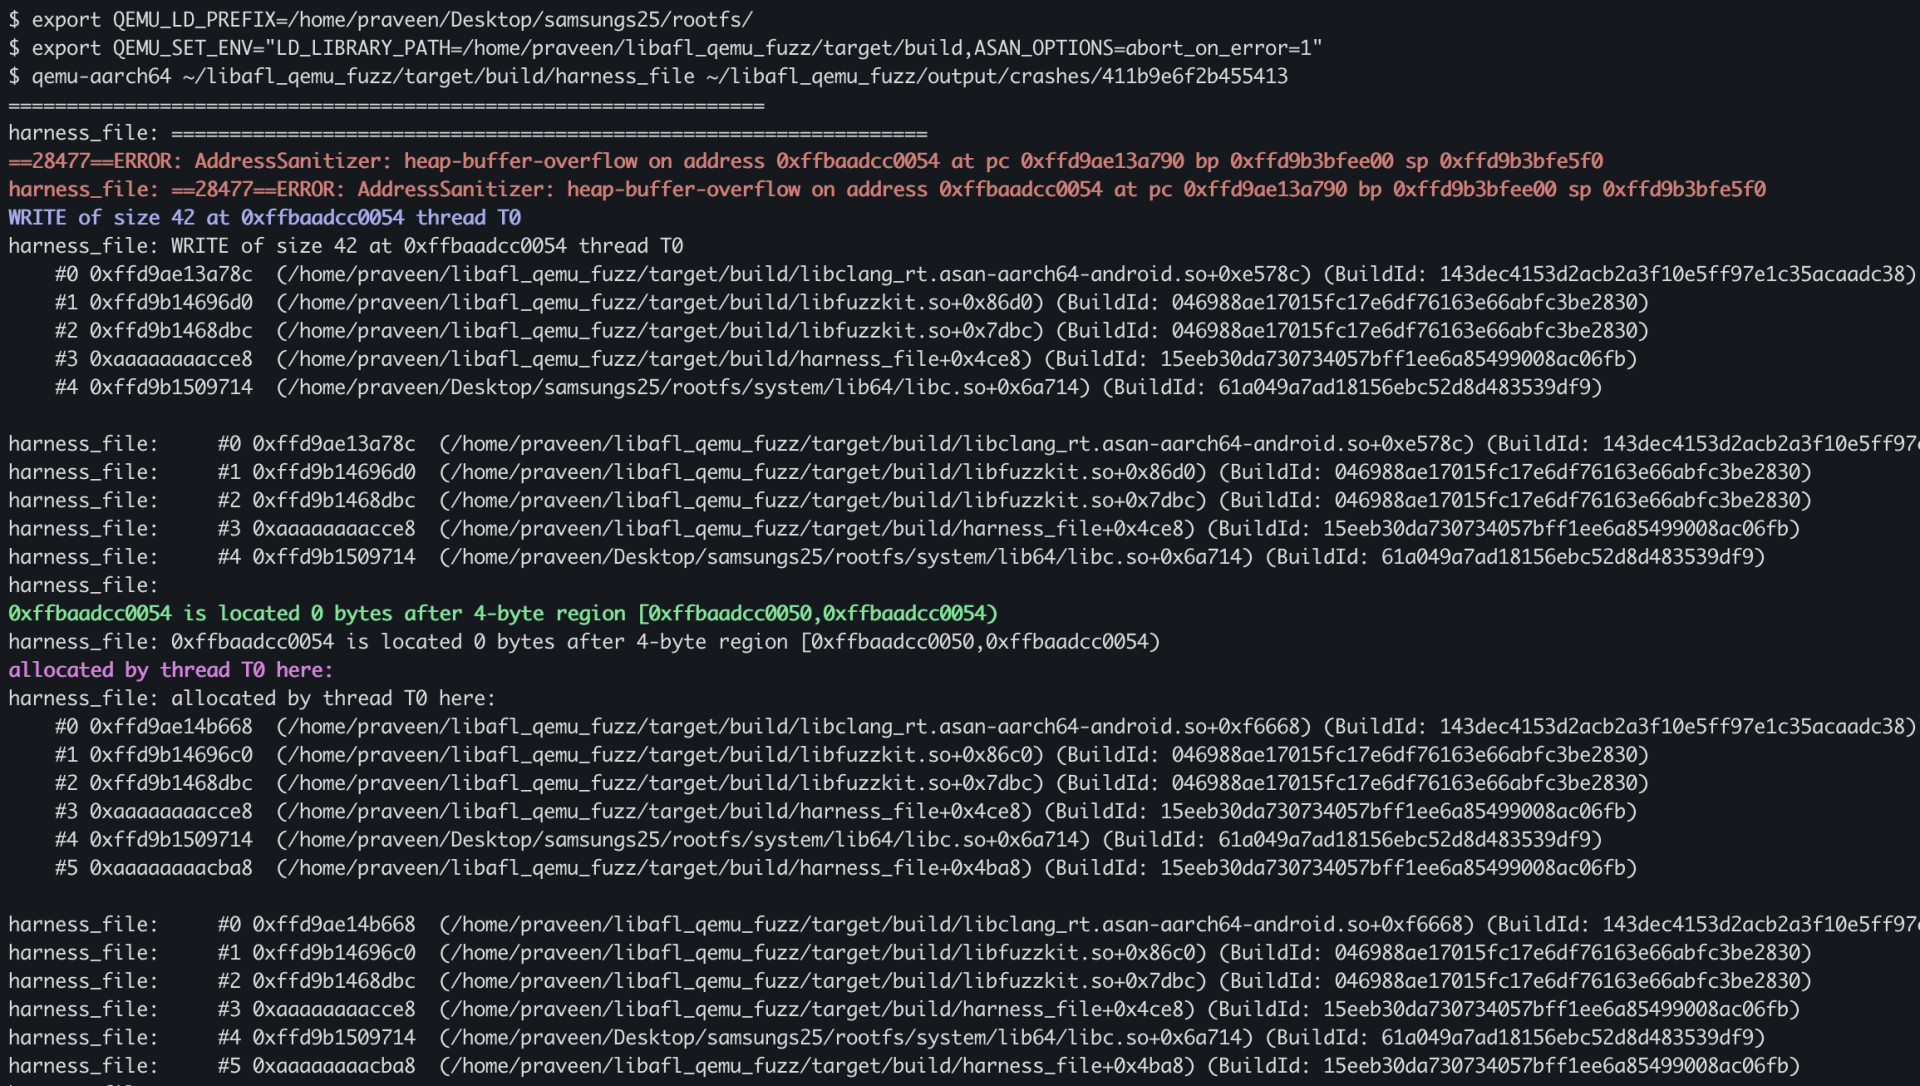
To analyze the crash properly, we need to rebuild the harness with a couple of changes: make it read the input file path from a command-line argument, and compile it with AddressSanitizer enabled.
Now we’ll run the harness under QEMU user-mode to emulate the AArch64 binary and reproduce/check all the crashes.
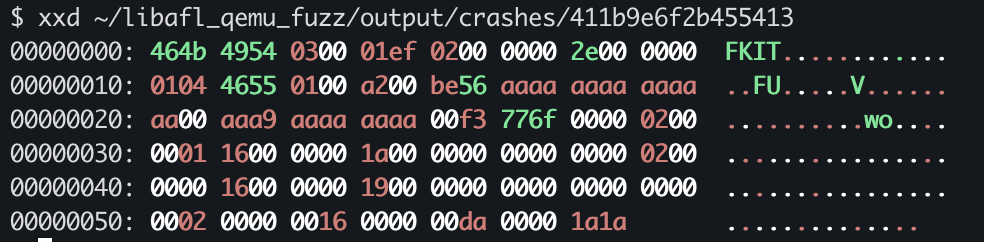
After reviewing the crashes one by one, we found a few real, reproducible crashes that actually hit the target vulnerability in our custom library.

Conclusion
In this blog post, we built a simple and practical workflow for fuzzing AArch64 Android binaries using LibAFL in QEMU user-mode. We started by understanding how LibAFL works with its modular design and how QEMU helps us run binaries from a different architecture while still getting useful coverage feedback. Then we brought everything together—writing a basic harness, targeting a custom native library, and connecting the core LibAFL components that make the fuzzing loop run.
After getting the fuzzer running, we focused on what really matters: analyzing the results. By going through the objectives and replaying crashes using the harness, we were able to verify and better understand the issues we found. This gives us a complete, end-to-end setup—from taking an Android .so file to actually finding and confirming crashes—without needing to run a full Android system.
In the next blog post, we’ll go one step further by fuzzing a real-world Android library using LibAFL in Frida mode, where we can work directly with live processes and explore deeper, more realistic execution paths.
Check out our courses that cover full chain exploitation,
Android Userland Fuzzing and Exploitation
https://www.mobilehackinglab.com/afe-promo
Android Userland Fuzzing and Exploitation
https://www.mobilehackinglab.com/afe-promo
Android Kernel Fuzzing and Exploitation
https://www.mobilehackinglab.com/course/android-kernel-fuzzing-and-exploitation
Get both together with a special bundle sale with 60% discount!
https://www.mobilehackinglab.com/bundles?bundle_id=android-kernel-userland
Want to learn to Chained AppSec bugs to get remote code execution?
Advanced Android Hacking - Road to Pwn2Own
https://www.mobilehackinglab.com/course/advanced-android-hacking

Copyright © 2024
Company
Mobile Hacking Lab B.V.
Registration:
97390453
VAT:
NL868032281B01
Registration:
97390453
VAT:
NL868032281B01